How to Add a Trip to PaddlingMaps.com
HOW TO ADD A TRIP TO THE DATABASE
Firstly, thanks so much for using Paddling Maps. With your help, we hope that this will rapidly become a worldwide paddlesports resource that we will all benefit from.
This document is just a simple outline as to how to add waterways to the website database. As you go through this we welcome any feedback, comments or concerns you may have. We are essentially trying to build a resource for YOU and paddlers you know, so your direction and ideas are crucial to the success of this project.
Please send any thoughts or feedback directly to me (Simon Coward) at [email protected]
STEP 1: Go to http://paddlingmaps.com and click the login button
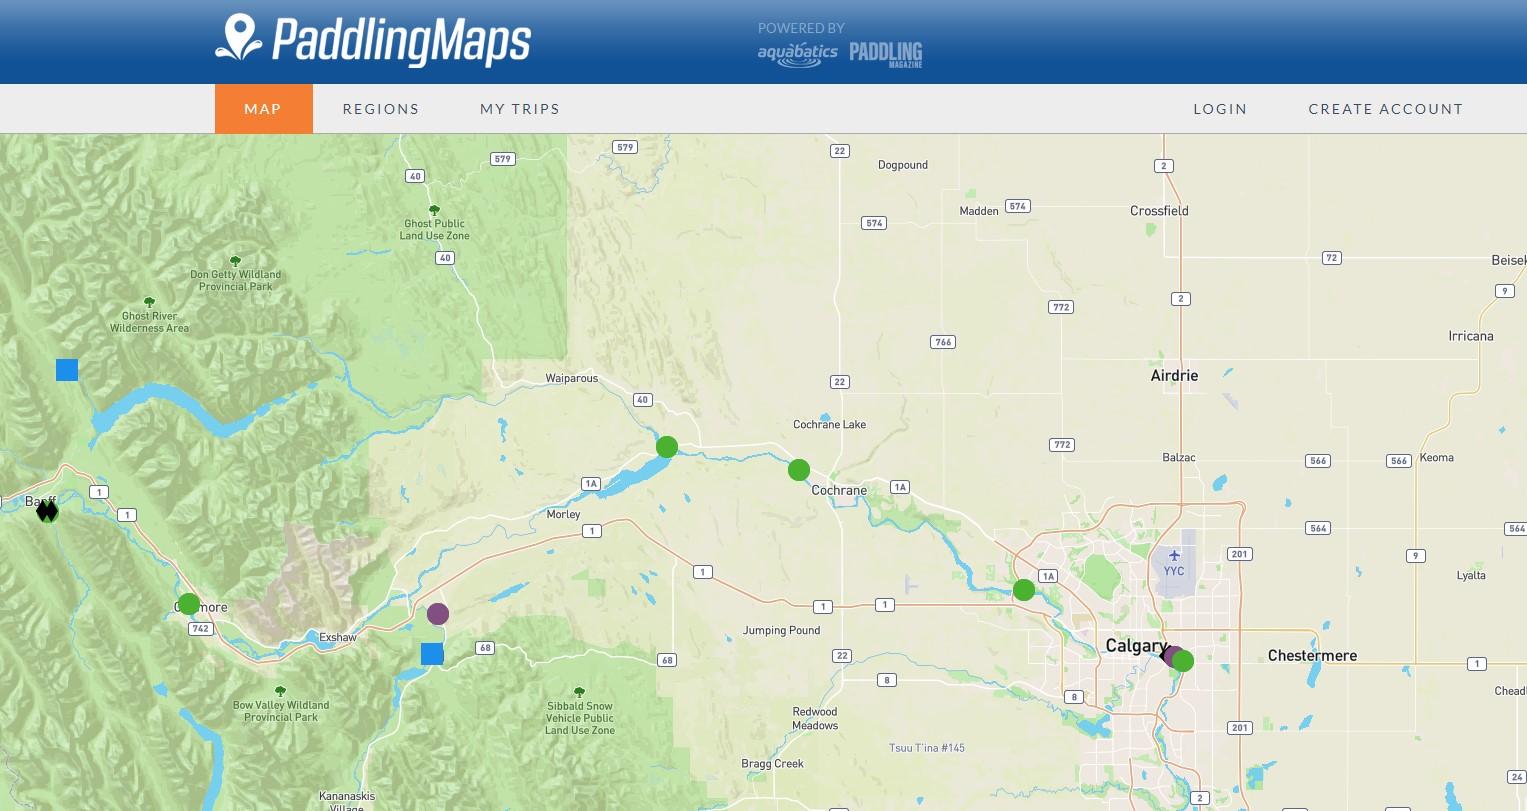
STEP 2: If you have an account already, simply login. If you have yet to create an account please choose to ither create an account through Facebook or Gmail. This is a very quick and easy process.
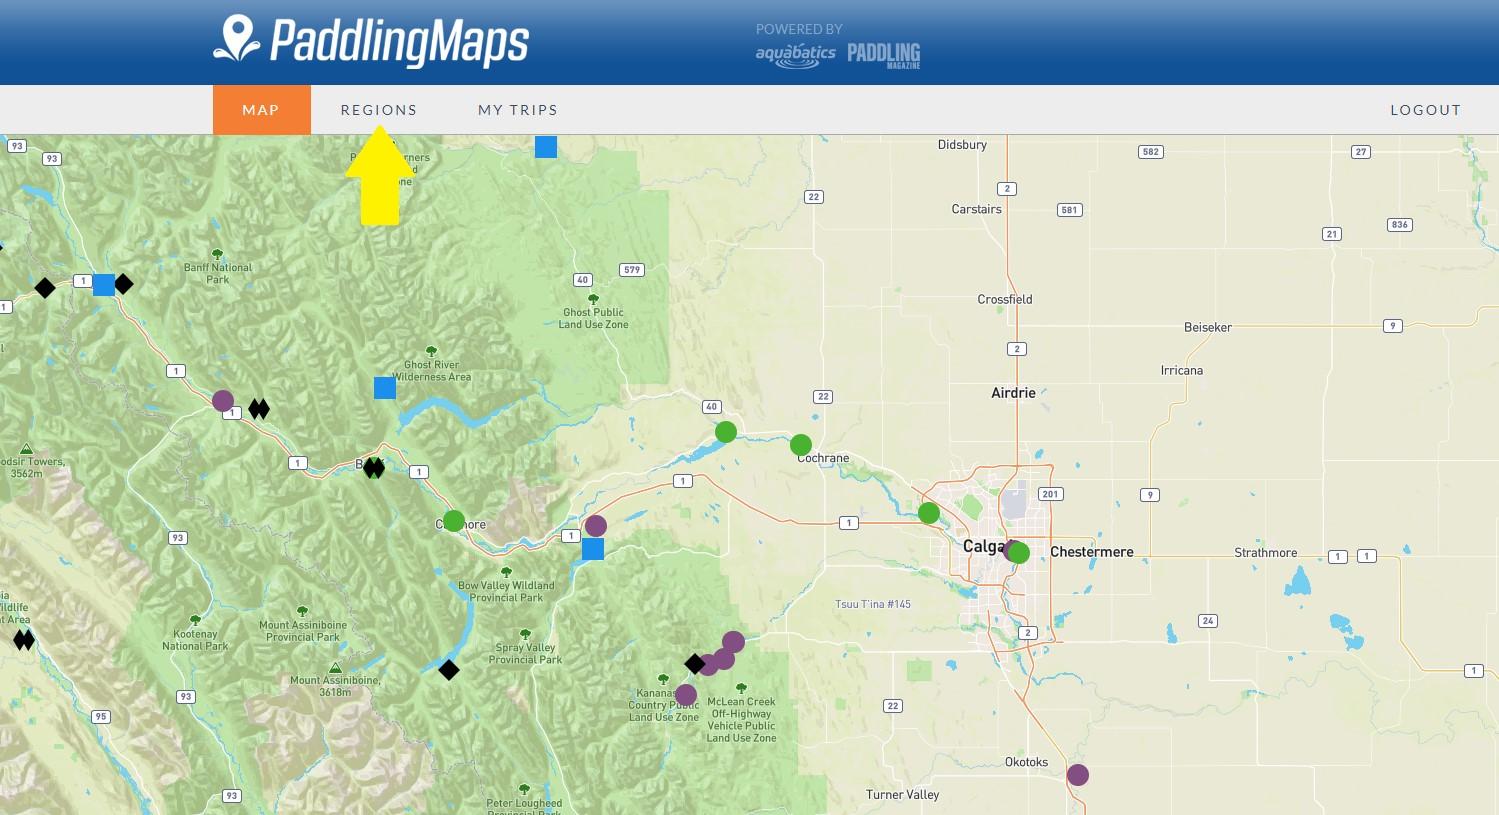
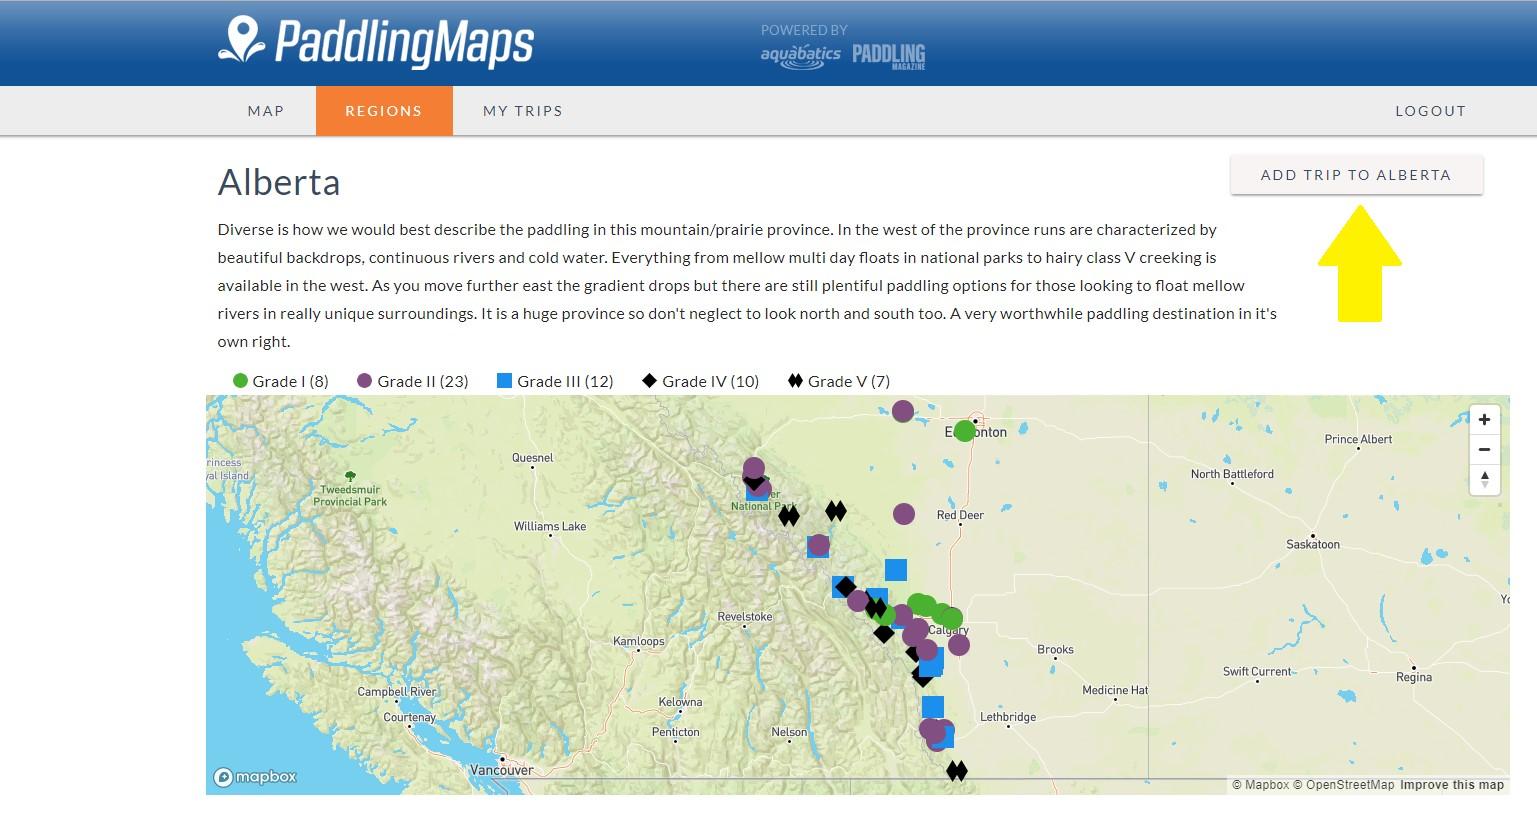
STEP 3: Click on REGIONS tab in the navigation bar
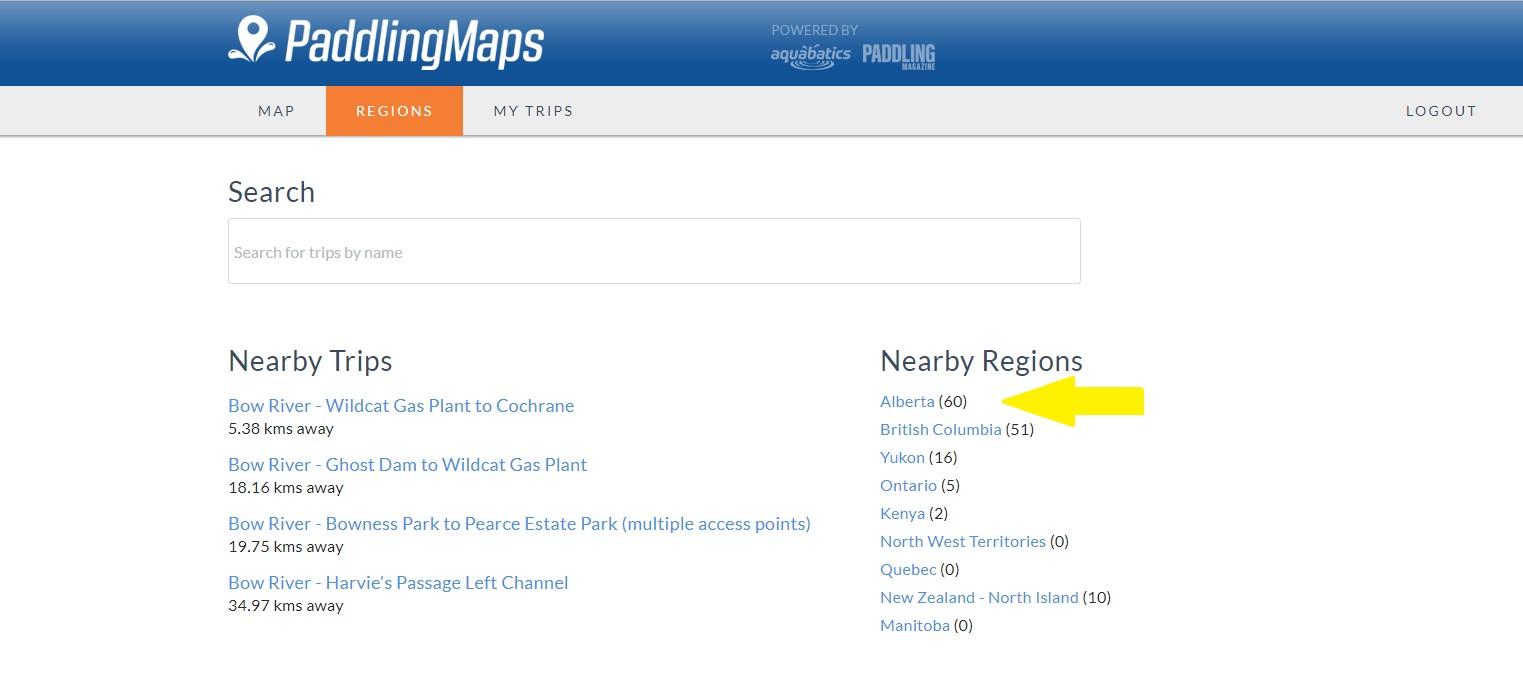
STEP 4: Click on your province (region) from the list on the right
STEP 5: Click on ADD TRIP TO “YOUR REGION”
STEP 6: You are now at the trip adding page. If you are able to get info from the old www.paddlingabc.com site, then that is great. If not, manually entering information is quick and easy. We have outlined the info required as best as possible in the trip editing page.
The trip adding/editing page is broken into a few key categories, with a number of info sources in each
Upload a GPX
Trip Type
Location
Trip Details
Shuttle Logistics
River Features
River Flow Data
Map and Waypoint Editor
·
See below for a brief visual and over view of each category and information fields. If you know a run well this whole process will take less than 10 minutes per river.
STEP 7: UPLOAD A GPX FILE (NOT REQUIRED)
Here you can upload a gpx track and waypoints of you have. THERE IS NO NEED TO DO THIS A THE WAYPOINT CREATOR IS SUPER SIMPLE AND QUICK TO USE.
Note: Paddling Maps is set up to only show waypoints, GPX tracks are hidden

Waypoint Note: If you do upload a gpx with waypoints, you will still need to edit the descriptions and types in the waypoint editor.
STEP 8: TRIP TYPE
At this stage (February 2018), only river is available. In the future you will be able to select lake or ocean and that will bring up a different set of parameters in the trip category. For now it is just set as default on river.

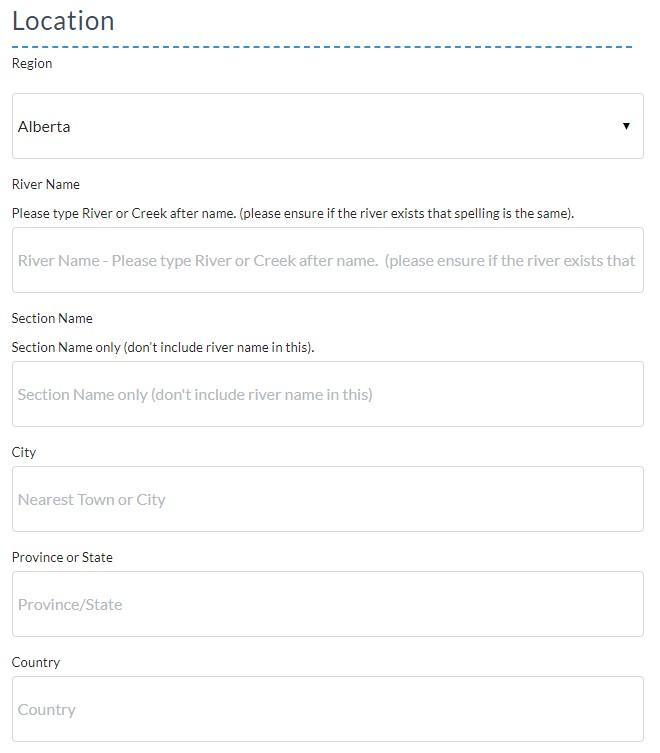
STEP 9: LOCATION
This section will help users (and filters) locate the trips they are looking for. As per the image below you need to complete:
1. REGION – Select appropriate region from the drop-down menu. If your region is not enabled please email [email protected] and we will get that added right away.
2. RIVER NAME – Please carefully type in the river name WITH River, Creek, Stream etc afterwards. If the river already exists and you are adding a new section please double check it matches the current one exactly. (otherwise we will have confusing duplicate rivers)
3. SECTION NAME – This allows us to differentiate different sections of the same river. Fill this field with the runs common name or a put in name out takeout name. (ie. Elbow Falls to Boat Launch). YOU DO NOT NEED TO ENTER THE RIVER NAME HERE.
4. CITY – Add the nearest city (with services) to the Put In. Please capitalize first letters as we don’t want to create duplicate cities in search filters
5. PROVINCE OR STATE – Enter the province/state or area the run is in. Again, capitalize the first letter of all words and refer to existing ones to ensure no duplicates.
6. COUNTRY – Enter the country of the run in this field
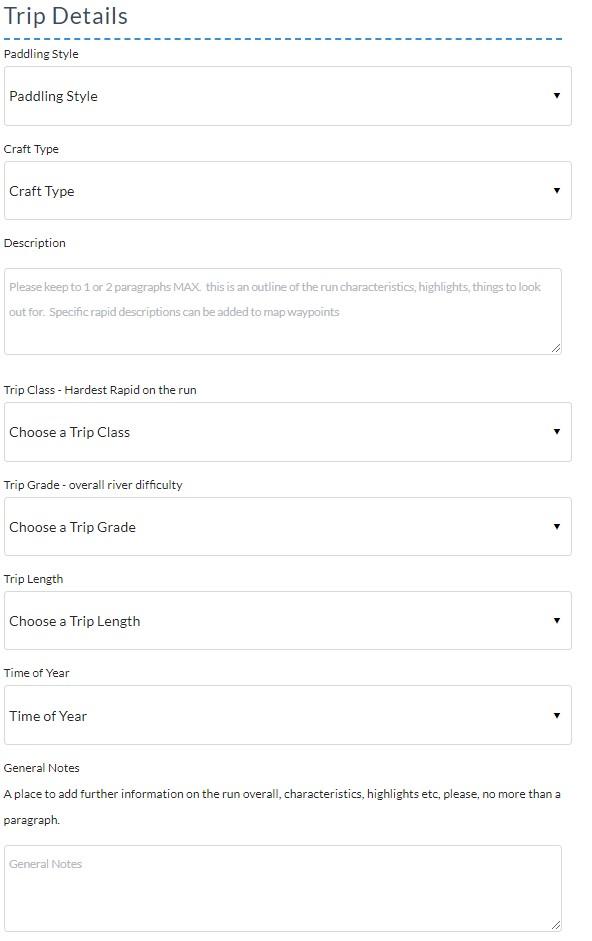
STEP 10: TRIP DETAILS
This section helps Paddling Maps users have an understanding of the basic river characteristics, what craft it is suitable for, difficulty etc. As per the image below you need to complete:
1. PADDLING STYLE – Choose from the drop-down menu the style of paddling. Please select all that are appropriate.
2. CRAFT TYPE - Choose from the drop-down list the appropriate craft the run is suitable for. Think about for the average paddler. Yes, there are SUP paddlers that will run Class V but most won’t! Select all that are relevant.
3. DESCRIPTION - Please keep the description to 1 or 2 paragraphs. It isn’t meant to be a rapid by rapid rundown. More of some general characteristics, highlights, hazards etc rundown. More detail can be added in the waypoint descriptions if needed.
4. TRIP CLASS - Please use the drop-down list to select the HARDEST RAPID ON THIS RUN or WHAT THE GRADE IS AT HIGH WATER LEVELS.
5. TRIP GRADE - The overall difficulty of the run. If in doubt air on the side of gradin higher than it is, rather than sand bagging paddlers with ‘under graded’ runs.
6. TRIP LENGTH - Choose the most appropriate time line for the run (for someone doing it for the first time), including shuttle.
7. TIME OF YEAR - Select all that are appropriate for the run. Rain rains will fall under year-round as even though the winter it more likely you can paddle in the summer if it rains.
8. GENERAL NOTES - A field to add any further information you see as relevant. Try and keep to 1 or 2 paragraphs at the most. Could highlight interesting facts, wildlife, portages and more.
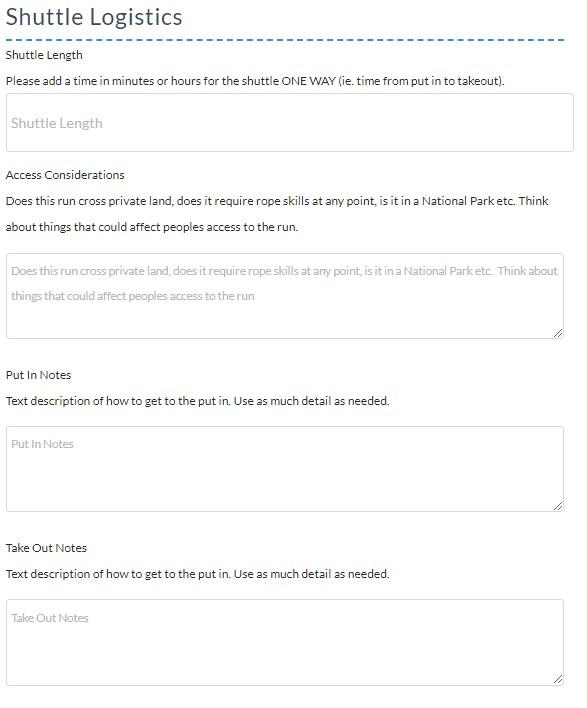
STEP 11: SHUTTLE LOGISTICS
This section is to ensure people know how to access and egress the river. For most runs please keep directions brief, the mapping functionality will get people to the rivers. IF HOWEVER, the run requires lots of navigating unlisted logging roads and google maps doesn’t help get to the put in, then add as much detail as needed. As per the image below you need to complete:
1. SHUTTLE LENGTH - The ONE WAY approximate time to do the shuttle using ‘mins’ or ‘hours’ as the time unit measure
2. ACCESS CONSIDERATIONS - A free form field where you can add relevant info on access. Examples: Do you need to consult with private land owners, is it in a National Park, Permits Required etc. The more info on who to contact for relevant information the better. Feel free to include links.
3. PUT IN NOTES - Text direction to the put in.
4. TAKE OUT NOTES - Text directions to the take out.
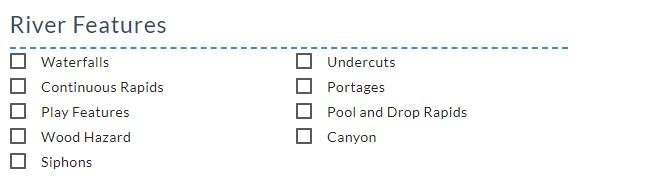
STEP 12: RIVER FEATURES
Help users (and filters) get an idea of what types of river features they are likely to encounter by selecting all that apply from the check boxes. See image below for options.
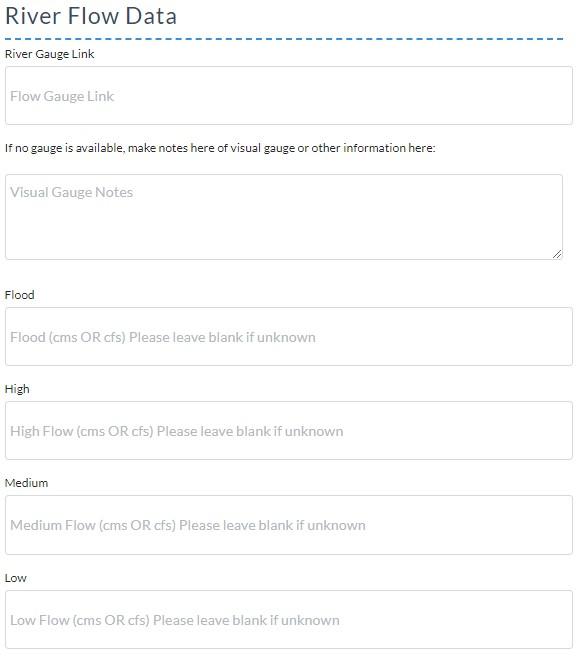
STEP 13: RIVER FLOW DATA
This section will help users access not only the river levels from online resources but also give an idea of appropriate flow ranges. As per the image below you need to complete:
1. RIVER GAUGE LINK - Copy and paste URL of river gauge into this field
2. VISUAL GUAGE NOTES - If run doesn’t have a gauge and there is an easily identifiable visual gauge, please provide details here. Can also be used to elaborate on online gauge if useful.
3. LEVEL RANGES (LOW | MEDIUM | HIGH | FLOOD) - Add in flow values that fit into the categories listed. Please list using ‘cms’ or ‘cfs’ as the measurement values.
After completing all this information please go to the bottom of the page and click the SUBMIT button. This will take you to the mapping tool and waypoint creator.
STAGE 2 – WAYPOINT CREATOR
STEP 1: After completing the text description fields and clicking submit you will be taken to the map creator. At this stage you will see a general map, scroll around on the map and find the river you are working on. For the example below, it is the Elbow River near Bragg Creek, Alberta
STEP 2: Locate first your put ins and takeouts as these are the most critical information pieces for potential paddlers. For this run we use the Elbow Falls View point parking lot as the put in and the Elbow River Boat Launch as the Takeout
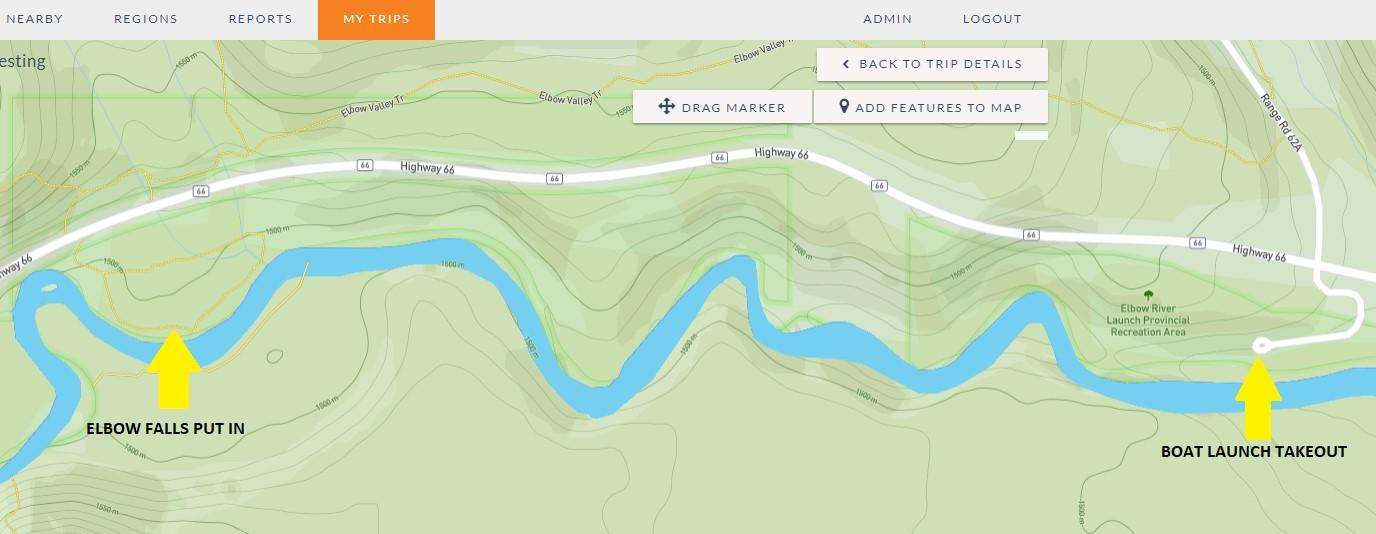
STEP 3: Now we add our first waypoints. Click the  button, then click your cursor anywhere on the screen to drop in a waypoint (the default type is put in). It will present itself like the image below. Once you have the waypoint ‘dropped’ into the map, move it to your desired location, please ensure accuracy at this stage.
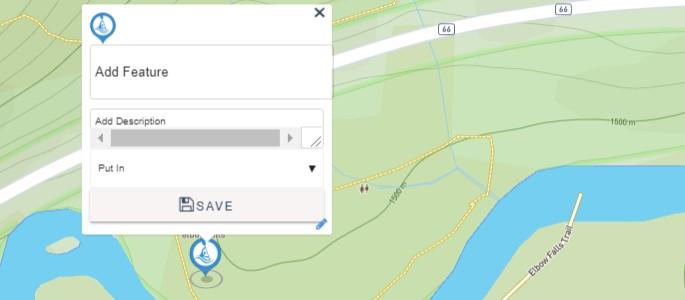
STEP 4: Now you need to complete the following info for the waypoint:
Add Feature: This will be the name of the waypoint, please keep it simple yet descriptive enough to be useful
Add Description: Please make any relevant notes on the waypoint
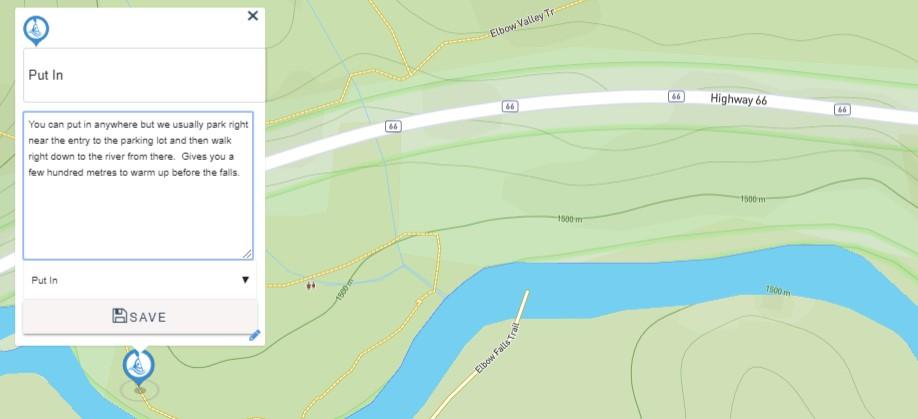
Put In: Could be specifics on where/how to put on, amenities on site etc.
Takeout: As per put in
Rapids (waterfall, continuous rapid etc): Any pertinent information. Where you usually scout from, best portage options etc.
Permanent Hazards (undercut, siphon, wood etc): Pertinent information that may help paddler navigate these hazards safely. Again, keep it simple but useful.
Waypoint Type: Select the appropriate waypoint from the drop down menu.
Once you have completed all the waypoint information click ‘SAVE’
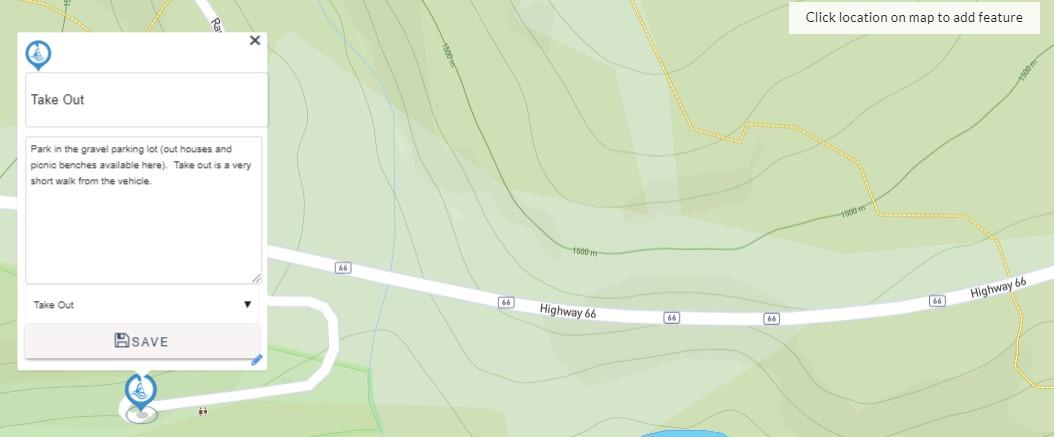
STEP 5: Now repeat this process for the take out. Put in and takeout are the bare minimum of waypoints we require for each section of river. This is so we can set up directions through google maps. If you want to add alternate put ins or takeout’s, please do so though they need to be named something like ‘Alternate Put in’.
NOTE: If a river has a long walk to the put in or take out, it would be worth adding a waypoint for the put in parking and a waypoint for the put in to the river. Good text directions for the walk will be sufficient to explain how to get to the river.
STEP 6: Now you can go ahead and add as much local knowledge as you can. You can add waypoints for rapids, permanent hazards, great playspots and more.

IMPORTANT NOTE: Please only add these waypoints if you are sure they are accurate, if you are not 100% sure please leave them off and hopefully another user will add at a later date.
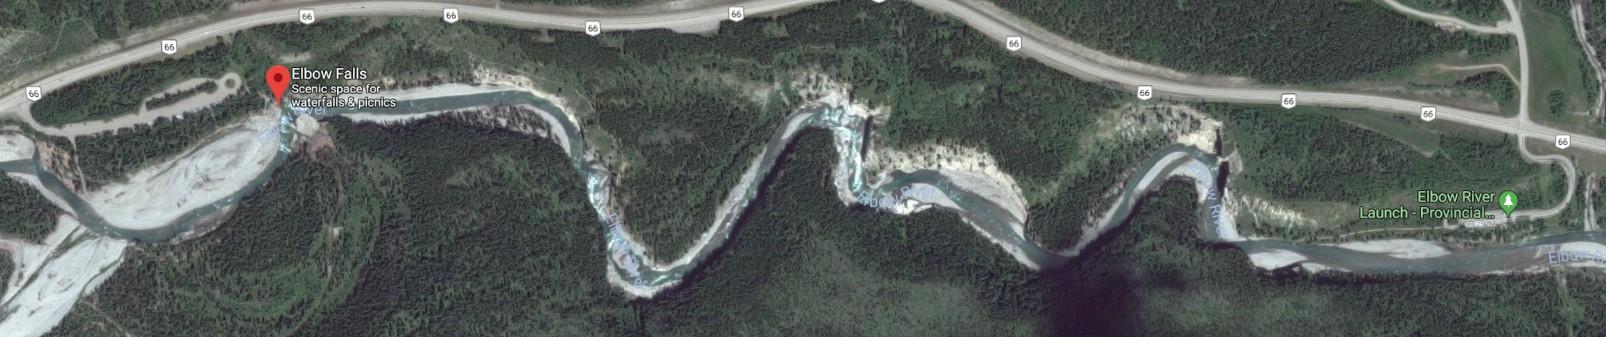
ADDITIONAL NOTE: I find it easiest to click the ![]() button to add waypoints in satellite view mode. This way you can see parking lots, significant rapids etc more easily. See below for image comparisons of satellite view and topo view
button to add waypoints in satellite view mode. This way you can see parking lots, significant rapids etc more easily. See below for image comparisons of satellite view and topo view
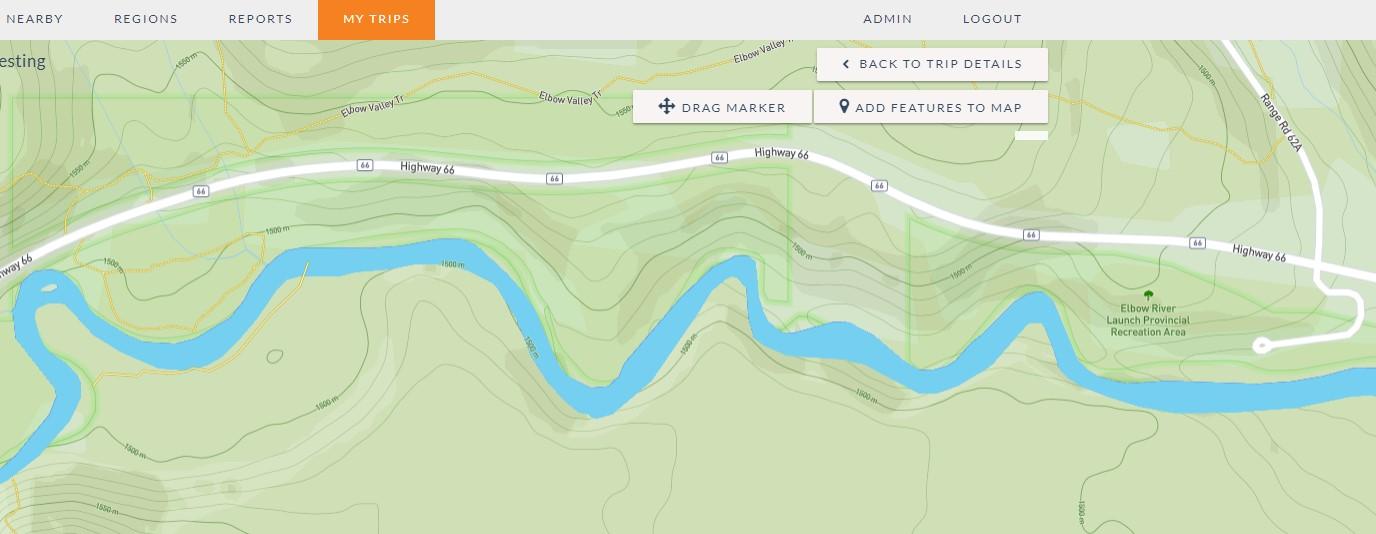
SCREEN SHOT OF MAPS IN ‘SATELLITE’ MODE
SCREEN SHOT OF MAPS IN ‘TOPO’ MODE

We are planning on building in the ability to toggle between satellite and topo mode in the website. For now, this is an easy work around as it is much easier to identify exact rapid or feature location.
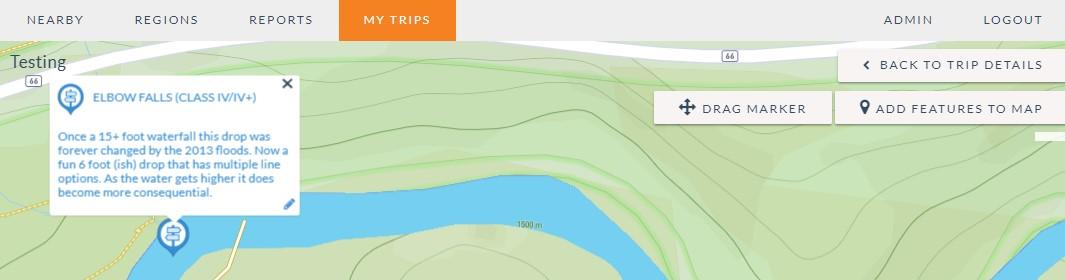
SCREEN SHOT WITH WATERFALL/RAPID ICON
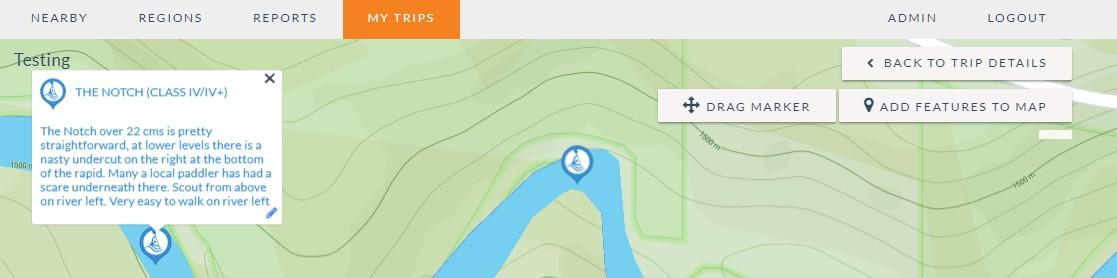
SCREEN SHOT WITH CONTINUOUS RAPID ICON
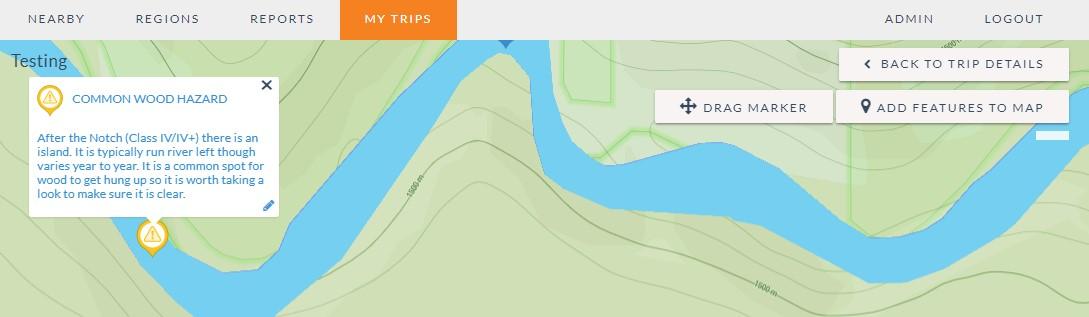
SCREEN SHOT WITH HAZARD (SIPHON/UNDERCUT/WOOD) ICON
Step 7: As per the screen shot below you can manage all your waypoints in the list below the map. Simply click on the pen (edit) icon to make any changes. Once all waypoints are added you can click back to trip details and you are all set!
Now just double check all the waypoints are in the correct spot and info is right, then, that’s it. The river/section is added. Please make notes of any glitches or feedback you have and try and compile into 1 email and send to [email protected]. Any thoughts positive or constructive are gratefully received as we develop this into a super user-friendly interface for moderators, content contributors and users.
AT THIS STAGE YOUR RUN IS NOW SAVED AS A DRAFT. IT WILL BE VISIBLE IN YOUR MY TRIPS SECTION. ONCE A REGIONAL MODERATOR SEE’S IT (THEY WILL BE NOTIFIED UPON SUBMISSION), THEY WILL DOUBLE CHECK INFO LOOKS GOOD AND WILL THEN MAKE IT LIVE. AT THAT POINT IT WILL BE AVAILABLE FOR THE WORLD TO SEE!
Thank you so much for being involved in this project!
Simon Coward, Daniel Washbrook and Scott McGregor
Stay Connected. Get the PaddlingMaps app today!


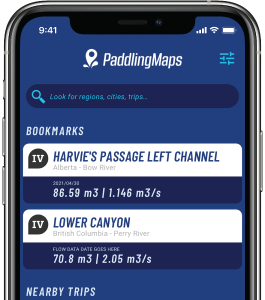
Get the trip info you need,
when you need it most.
- Save bookmarks for offline access
- View trip details
- View river flow data
- View trip feature map